In diesem Blogbeitrag wollen wir kurz aufzeigen, welche wesentlichen Möglichkeiten sich in Odoo für die Bezahlung von Lieferantenrechnungen anbieten. In der Version 17 sind Funktionen veröffentlicht worden, die die Zahlung von Verbindlichkeiten effizienter machen und die Kreditorenbuchhaltung entlasten. Ein weiteres Argument dafür, die integrierte Buchhaltung in Odoo zu nutzen!
Grundsätzliches zu Lieferantenrechnungen in Odoo
Zunächst einmal gilt es, mögliche Geschäftsfälle voneinander zu trennen:
Wir prüfen, ob es sich um eine bereits gebuchte Rechnung handelt, wir mit der Zahlung also einen Ausgleich unserer bilanzierten Verbindlichkeit herbeiführen möchten, oder ob es sich um eine Vorauszahlung handelt. Letztere impliziert, dass ein Leistungsaustausch noch nicht stattgefunden hat und der Verkäufer seiner zivilrechtlichen Verpflichtung gem. § 433 BGB (Erfüllungsgeschäft) erst nach Erhalt der Zahlung nachkommen wird. In diesem Beitrag konzentrieren wir uns aber primär auf die Zahlung von gebuchten Lieferantenrechnungen, weil diese Fälle den Regelanwendungsfall darstellen.
Filtern und Gruppieren von Lieferantenrechnungen in Odooo
Wir empfehlen, die zu bezahlenden Lieferantenrechnungen im Rechnungseingangsjournal zunächst durch den Einsatz geeigneter Filter herauszuarbeiten und entsprechend zu gruppieren, beispielsweise nach Fälligkeiten, Währungen, Banken oder Partnern. Die Filter sollten zielgerichtet und zweckgebunden eingesetzt werden. Hierbei gilt die Anlage entsprechender Favoriten als probates Mittel, weil diese für künftige Zahlungsläufe herangezogen werden können. Der Einsatz von bedarfsgerechten und standardisierten Favoriten hat sich zu einer deutlichen Verbesserung von Arbeitsprozessen etabliert. Die Favoritenfilter oder -gruppierungen lassen sich auch unkompliziert mit Kollegen teilen.
Zahlungen erstellen
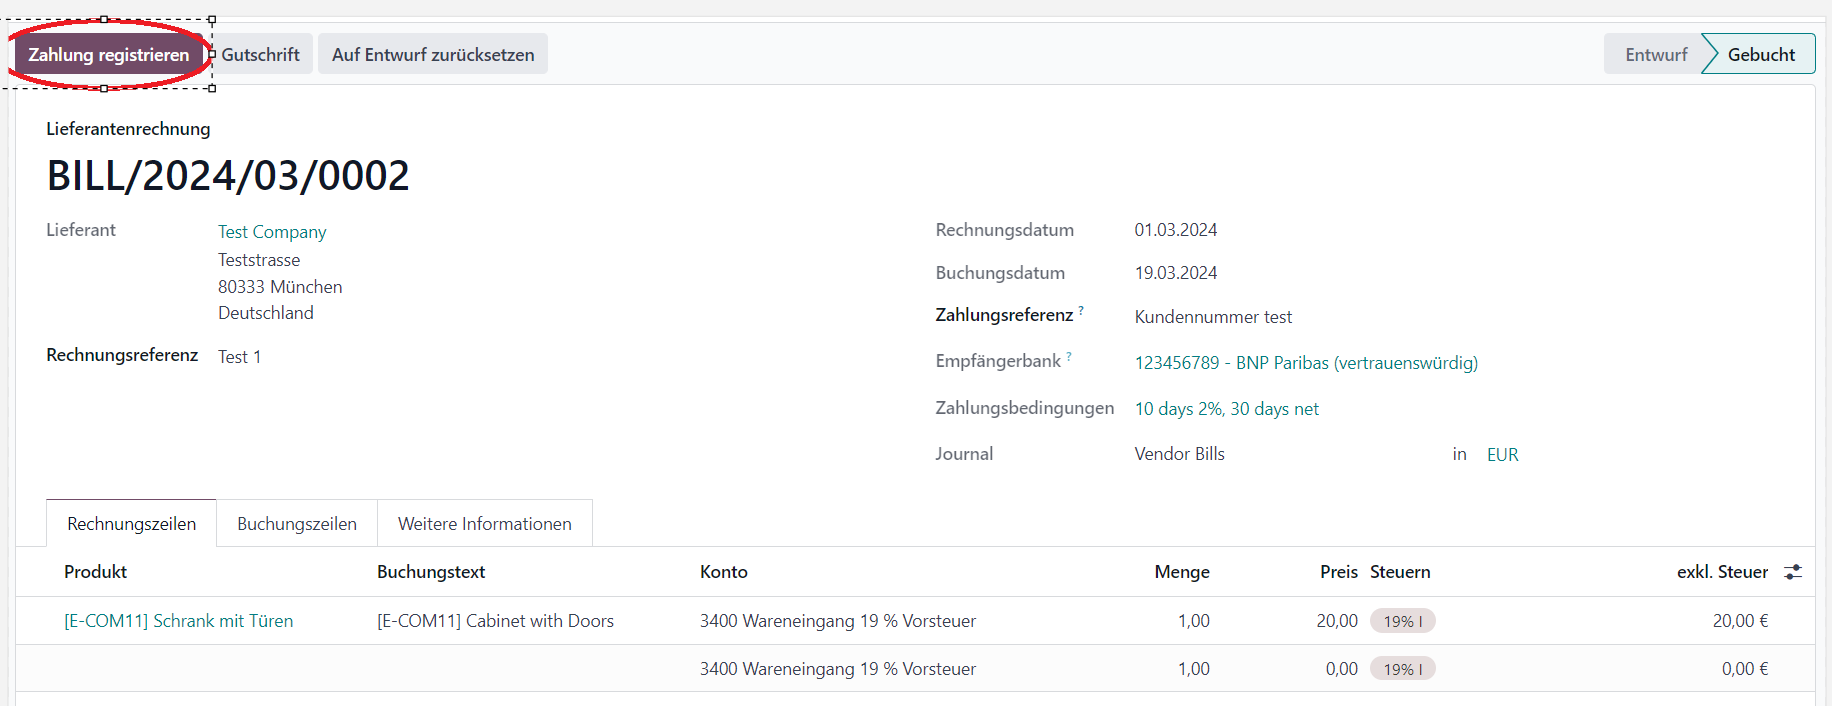
Zur Ausführung einer Einzelüberweisung gelangt man über den Rechnungsvorgang selbst, indem man im Beleg auf den Button „Zahlung registrieren“ klickt, der sich oben links in der Menüleiste befindet.
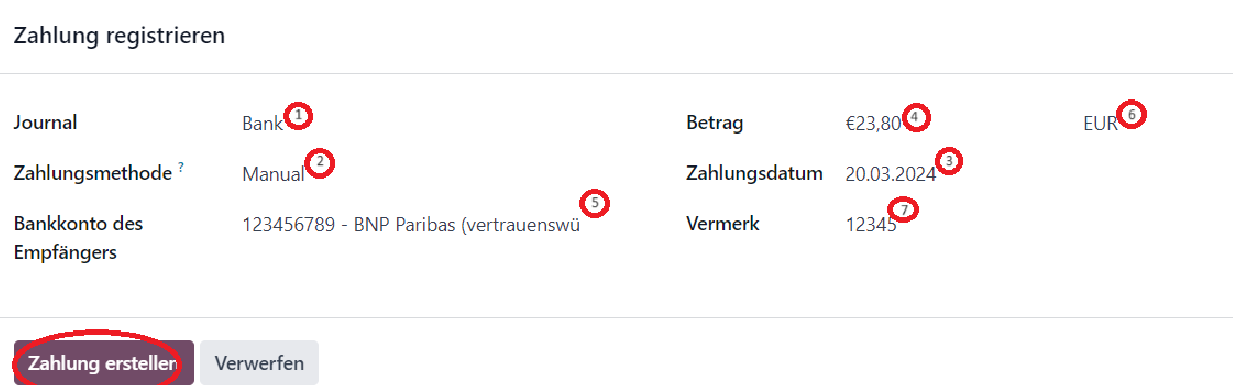
Im Zahlungsassistenten, der sich im Anschluss automatisch öffnet, werden die Zahlungsmodalitäten wie Zahlungsmethode 2 (SEPA oder manuell) und Zahlungsdatum 3 definiert. Hier hat man auch die Möglichkeit, Rechnungskürzungen vorzunehmen, indem man den Betrag 4 reduziert. Verfügt das Unternehmen über mehrere Geschäftskonten oder gar Geschäftsbanken, ist das für die Zahlung maßgebliche Konto über das Feld Journal1 auswählen. Die Empfängerbank 5 wird automatisch aus den Lieferanten-Stammdaten gezogen. Neu in Odoo 17 ist auch, dass man in einer anderen Währung bezahlen kann 6. Sofern bei der Rechnungseingabe keine gesonderte Zahlungsreferenz hinterlegt wurde, wird die Lieferanten-Rechnungsnummer werkseitig als Verwendungszweck 7 übernommen.
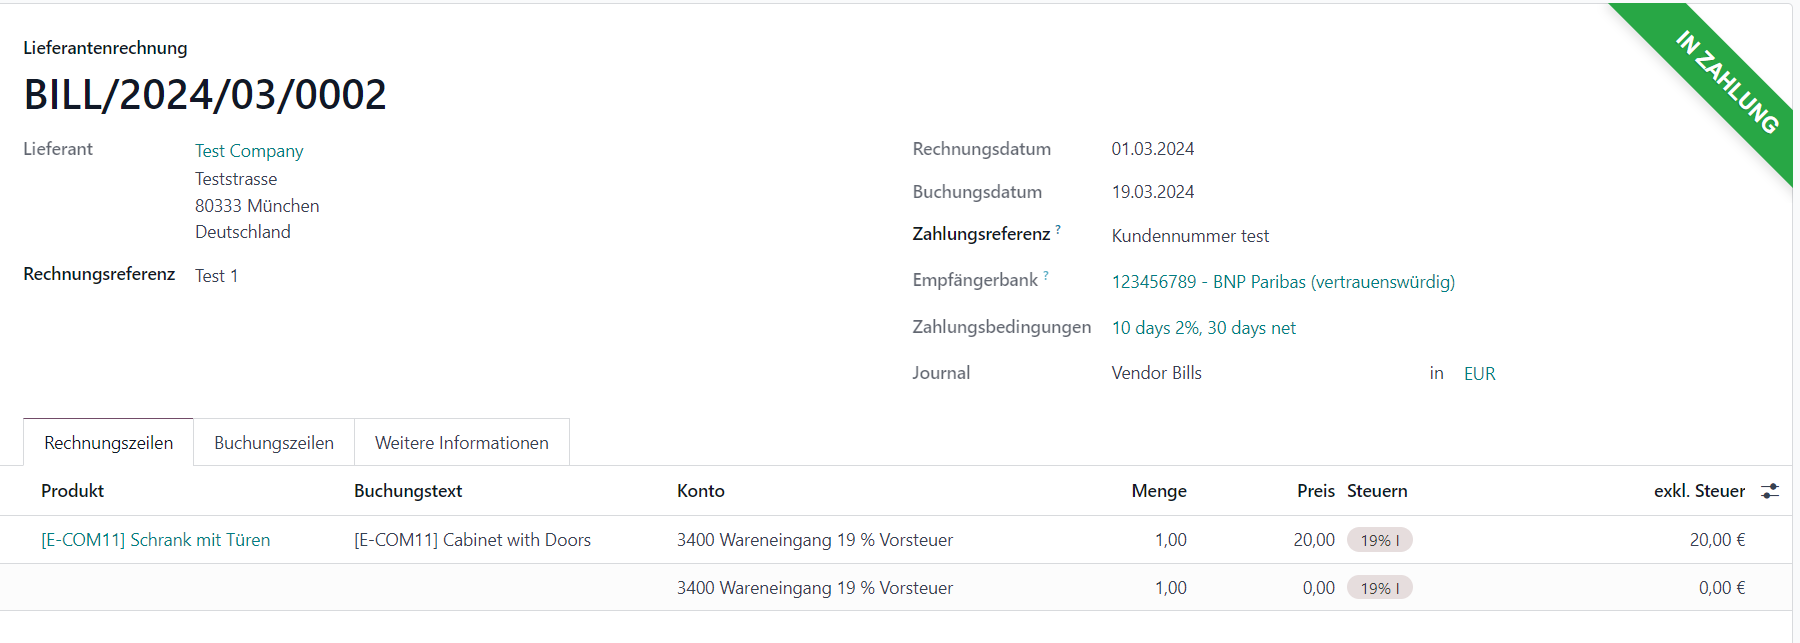
Durch Bestätigung des Vorgangs über den Button „Zahlung erstellen“ wird in Odoo automatisch eine Buchung erzeugt. Die Verbindlichkeit wird auf ein Zwischenkonto (Ausstehende Zahlungen) übertragen und die Rechnung auf den Status „in Zahlung“ gesetzt.
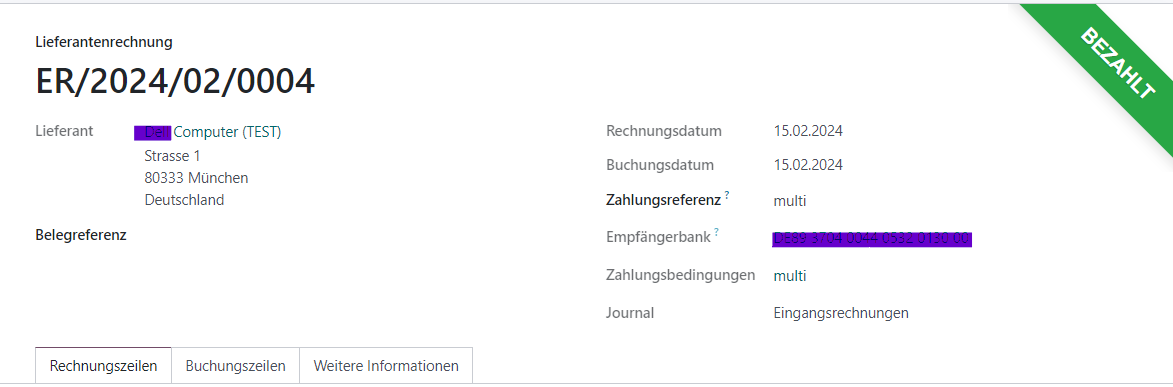
Der Betrag bleibt so lange auf dem Zwischenkonto, bis die Zahlung tatsächlich erfolgt ist und der Zahlungsausgang auf dem Kontoauszug erscheint. Über die Buchung des Kontoauszugs im Odoo Bankbuchungsjournal hebt sich die Buchung auf dem Zwischenkonto wieder auf, so dass die Verbindlichkeit vollständig aus den Büchern erlischt und der Rechnungsstatus auf „bezahlt“ übergeht.
Besonderheit Skonto
Odoo prüft die im Partnerstamm hinterlegten Zahlungsbedingungen und kürzt Rechnungsbeträge im Falle einer fristgerechten Zahlung automatisch. Doch auch beim Überschreiten von Zahlungsfristen ist es jederzeit problemlos möglich, Rechnungskürzungen manuell in Abzug zu bringen. In unserem Blog-Beitrag „Automatische Verbuchung von Lieferantenskonti - Worauf ist zu achten?“ gehen wir genau auf die Besonderheiten zum Thema Skonto ein und zeigen auf, wie die Vorsteuer-Korrektur bei der Verbuchung von Skontoerträgen automatisch in Odoo erfolgt.
Stapelüberweisungen in Odoo
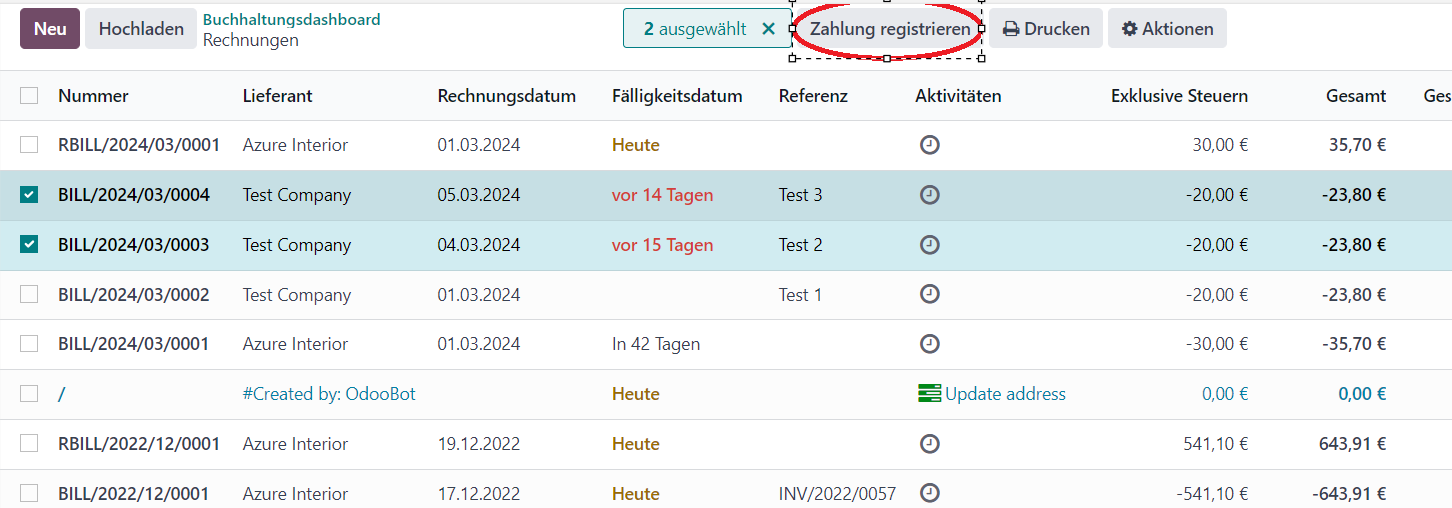
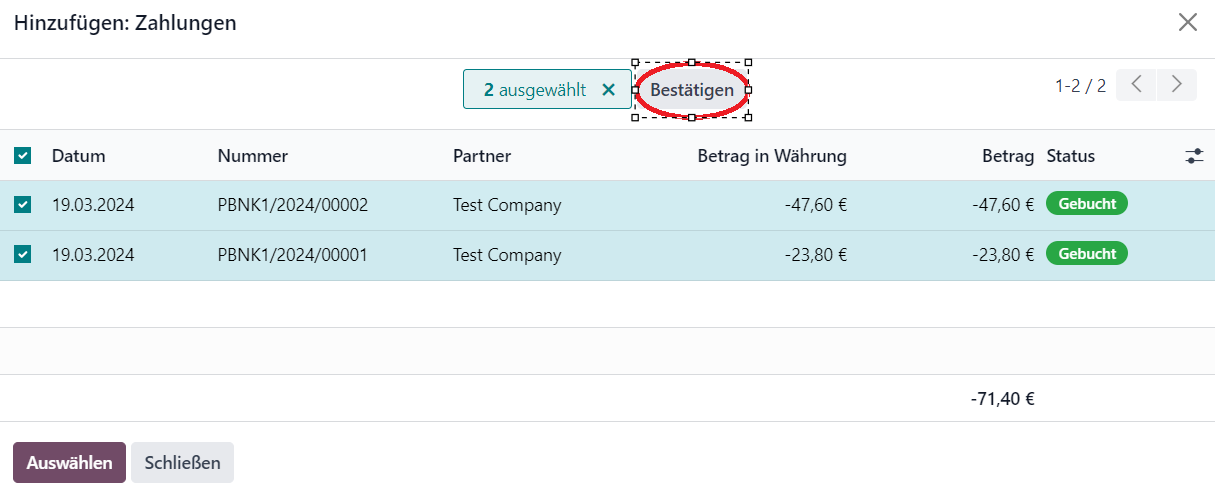
Natürlich hat man die Möglichkeit, sogenannte Batch Payments (Stapelüberweisungen) zu erstellen, d.h. mehrere Lieferantenrechnungen gleichzeitig anzuweisen. Auch können für Sammelzahlungen entsprechende Zahlungsvorschlagslisten erstellt werden. Im ersten Schritt wählt man dazu die entsprechenden Belege aus. Entweder, wie oben beschrieben, in der Rechnung selbst oder direkt im Rechnungseingangsjournal. Dies geschieht, indem man ein Bestätigungs-Häkchen in das jeweilige Kästchen vor die zu zahlende Rechnung setzt.
Sobald alle Rechnungen – oder auch nur eine – mit Hilfe der Häkchen ausgewählt wurden, drückt man auf den Button „Zahlung registrieren“. Damit der Button erscheint, muss zwingend mindestens eine Rechnung mit Hilfe des Häkchens ausgewählt worden sein.
Sobald die Zahlungen registriert wurden, öffnet sich, wie eingangs beschrieben, auch hier der Zahlungsassistent – jedoch mit einer zusätzlichen Funktion „Zahlungen gruppieren“.
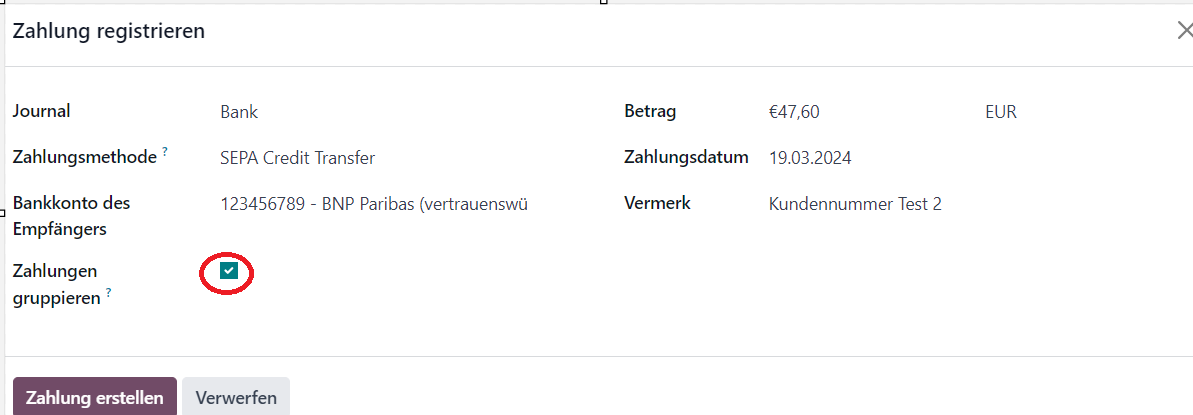
Wird hier ein Häkchen gesetzt, erhält der Zahlungsempfänger auf seinem Kontoauszug einen Gesamtbetrag, der sich aus mehreren Zahlungen zusammensetzen kann. Das ist beispielsweise dann der Fall, wenn mehrere Lieferantenrechnungen an ein und denselben Gläubiger (Lieferanten) bezahlt werden. Ist das Häkchen nicht gesetzt, so erhält der Zahlungsempfänger mehrere Zahlungen, weil die Rechnungen einzeln und nicht in einer Summe überwiesen werden. Durch „Zahlung bestätigen“ werden auch hier die Verbindlichkeiten auf das Zwischenkonto (Ausstehende Zahlungen) übertragen und die Rechnungen auf Status „in Zahlung“ gesetzt.
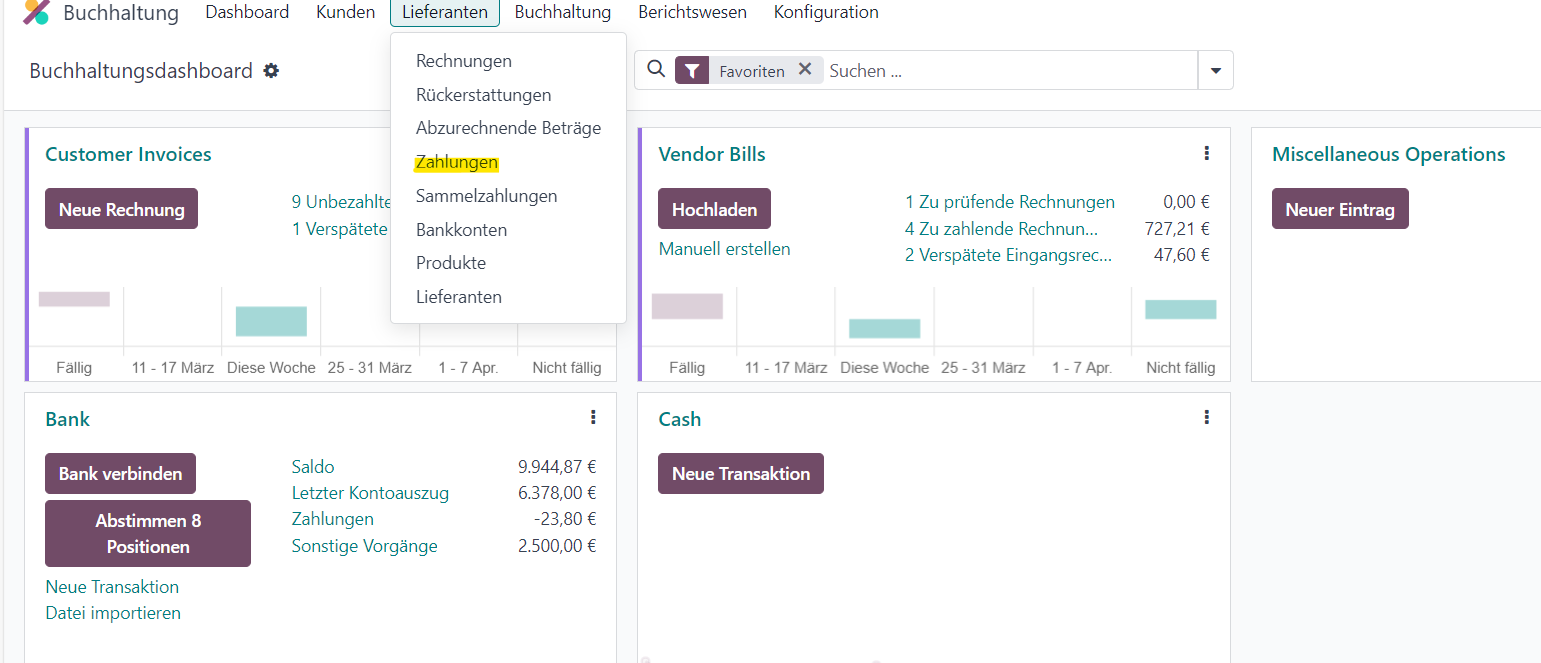
Der Batch selbst kann entweder im Menü Lieferanten / Zahlungen oder auch im Menü Lieferanten / Sammelzahlungen erstellt werden. Im ersten Fall wählt man wieder mit Hilfe des Bestätigungs-Häkchens jene Rechnungen aus, die für die jeweilige Sammelzahlung in Betracht kommen und bestätigt den Vorgang durch „Stapel erstellen“.
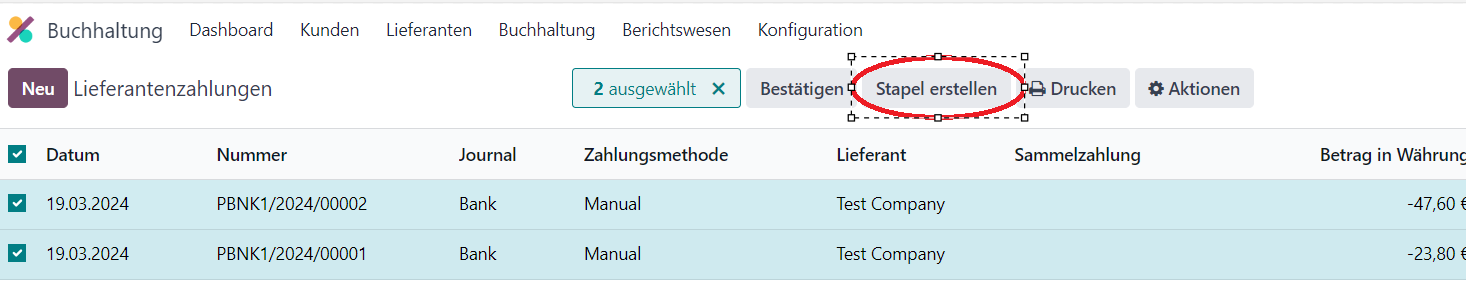
Entscheidet man sich für die zweite Variante, die Stapelzahlung aus dem Menü Lieferanten-Zahlungen heraus anzufertigen, muss man zuerst einen neuen Batch erstellen. Im weiteren Schritt bestätigt man die bereits zuvor bei der Zahlungsregistrierung ausgewählte Bank. Unter „Zeile hinzufügen“ sammelt man an dieser Stelle alle Rechnungen ein, die diesem Batch (Stapel) zugeordnet werden sollen.
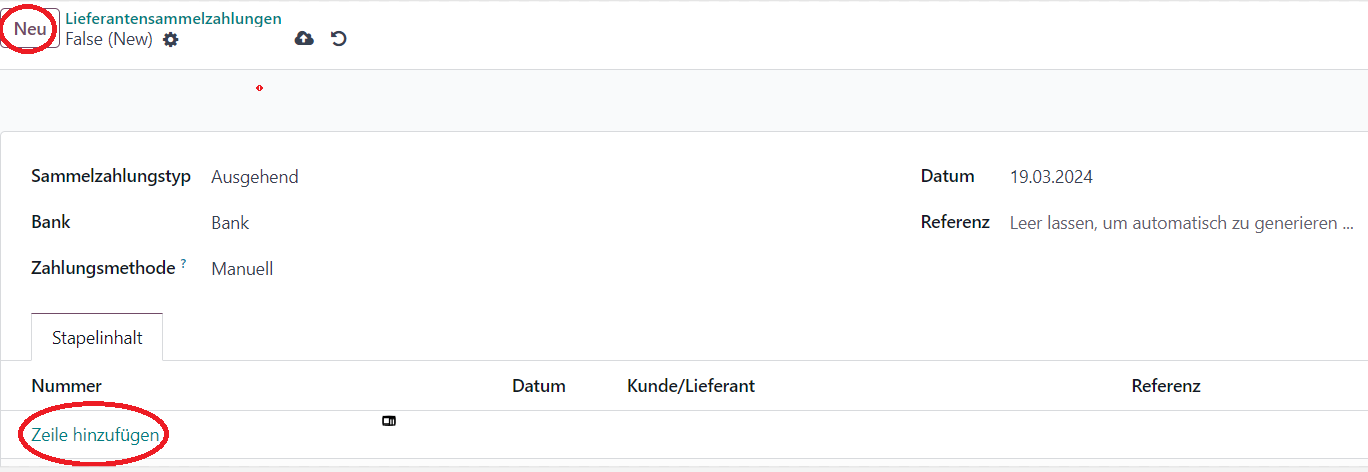
Ungeachtet, aus welchem Menü der Batch nun erstellt wurde, gilt für beide Fälle: Durch „Bestätigen“ wird eine Zahlungsdatei generiert, die zur Ausführung der Zahlungen elektronisch an die Hausbank übermittelt werden kann.
Man kann beliebig viele Batch Payments erstellen, beispielsweise getrennt nach In- und Ausland, SEPA- oder manuellen Zahlungen, verschiedenen Währungen oder auch Lieferanten.
War dieser Artikel hilfreich?
Dürften wir Sie bitten, uns eine Bewertung zu Ihren Erfahrungen mit openfellas zu hinterlassen?