For
a direct debit to work, the following requirements have to be met:
1) Configuration of finances
For the configuration of Finances, Direct Debit must be activated, and a corresponding Creditor Identifier has to have been filed:
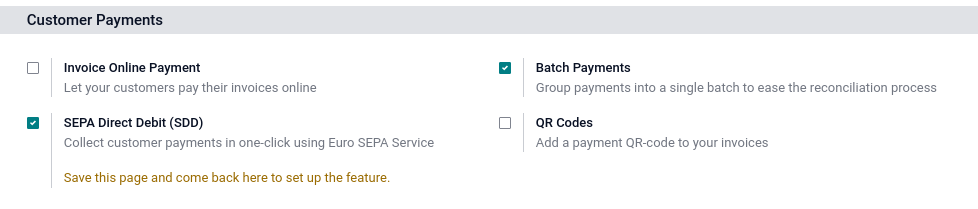
In
Odoo Standard, this should already be active. However, Batch Payments
are, of course, also a very convenient function for direct debit
collection.
You can obtain the Creditor Identifier directly from the client.
If you want to learn more about this subject, check out the following links:
- Bundesbank: https://www.bundesbank.de/de/aufgaben/unbarer-zahlungsverkehr/serviceangebot/sepa/glaeubiger-identifikationsnummer/allgemeine-hinweise-602858
- Wikipedia: https://de.wikipedia.org/wiki/Gl%C3%A4ubiger-Identifikationsnummer
2) Bank journal
In the next step, at least one bank journal has to be configured.
In the journal, we first need the specification of an IBAN account number (see the top right of the screenshot):

In addition, the payment method with which the direct debits are to be collected has to be activated or listed in the bank journal.
Note: in some Odoo versions, this is done with a checkbox, e.g., in Odoo 12:
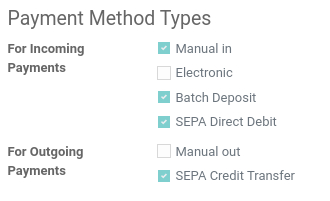
In Odoo 15, you get a list:

3)
Contacts App
Since Odoo 13, it is debatable whether this App does, in fact, add any value. In previous versions, partners could be highlighted as customers or suppliers independent of creating invoices, sales orders, or purchase orders. With version 13, Odoo tried to recognize them separately, either based on document types or via the menu item where the new contact had been created.
Since the Contacts App is essentially just a global address book that also allows the creation of new addresses, the logic for the automatic categorization as customer or supplier does not actually apply. How could it since it is a general configuration and not one taking place via the menu items Customers or Suppliers, respectively.
On the other hand, this App does have its advantages which are particularly helpful for the initial setup because it also includes access to create a bank directory or a complete overview of bank accounts (or country lists), which would not be accessible without the App.
Note:
Since
the App does not change the data structure in Odoo, an installation
for set-up purposes only and a later de-installation are conceivable.
4) Bank directory
Odoo starts with an empty bank directory. In most projects, this is barely noticeable since this is where internal bank accounts are created, and the few banks in question are usually created manually. As a rule, project managers or customers are oblivious to it.
If private individuals or B2C customers are involved in the project, the direct debit procedure comes to mind, and you become aware that Odoo does not recognize a single bank after installation.
As
there are quite a few things to consider in filling the directory,
let’s start a separate paragraph here.
Bank directory
If you only need a list of German banks, you will quickly find what you are looking for on the Bundesbank website: https://www.bundesbank.de/de/aufgaben/unbarer-zahlungsverkehr/serviceangebot/bankleitzahlen/download-bankleitzahlen-602592.
Here, you can download an up-to-date overview.
You will soon notice, however, that you cannot upload the list 1:1 into Odoo because, in Odoo, the BIC has to be unique. And quite often, this is not the case in the Bundesbank’s overview. Apparently, there is (and was) a lot of to-ing and fro-ing regarding the acquisition of banks, which is why quite a large number of entries sport the same BIC.
Unfortunately, this can only be cleaned up manually, and nothing more needs to be said about it. Basically, this also means that the list should be checked and updated at least once a year.
For an import, you only require three kinds of information:
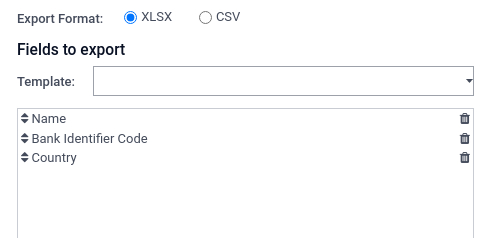
In
Country,
you can simply put DE for Germany.
Master data
In
the next step, we require permission for a direct debit. For this
purpose, a direct debit mandate has to be created per customer, and
in Customer
and Mandate,
of course, the account from which the receivable is to be debited.
Import
For an initial implementation and master data transfer, it does make sense to upload the information to Odoo via Excel. In theory, you can do it directly by importing the partner / company data. However, I would not recommend such a procedure as it would make the Excel template significantly more complex, automatically increasing the likelihood of error messages or incorrectly created data. Consequently, it would lead to considerably more time spent on editing or post-processing. And either way, at the end of the day, you will realize that individual steps would have been faster and more time-saving.
Customers
As a first step, you have to create or import the customer data. Here, too, it is not possible to provide general import templates since these and the individual steps very much depend on the project.
Bank accounts
I would, therefore, import the bank accounts first. To do this, you have to install the Contacts App first. It contains, under Configuration, the menu options Banks and Bank Accounts.
Since we may assume that the bank directory already exists, we can now start importing the bank accounts.
Explanation of the individual fields:

Account
Number:
Account or IBAN (Note:
Odoo automatically recognizes the account type based on the number
structure. It is not importable, as it is a calculated field.)
Account Holder refers to a partner in the address book. A name, a database ID, an external ID, or a customer number (reference) may be used as the specification in the import file.
Bank is an entry from the bank directory. To avoid complications, I would always specify a BIC from the bank directory in the import file, even though Odoo is able to handle bank names.
Account Holder Name: Should the account holder’s name differ from the name of the assigned partner, you may specify it here. The value is, of course, optional.
The result is the following import template, also attached as Bank Accounts (res.partner.bank).xlsx.

Note:
In Odoo, account numbers need to be unique. This also applies to a multi-company environment. An account created for another client cannot be imported a second time, even if it is now a second client!
There is no technical solution for this either. Bank accounts cannot be created across clients, like products or partners.
SEPA Mandates
The best way to import these is in the Finance App under Customer / Direct Debit Mandates. Let’s move on to the explanation of these fields:
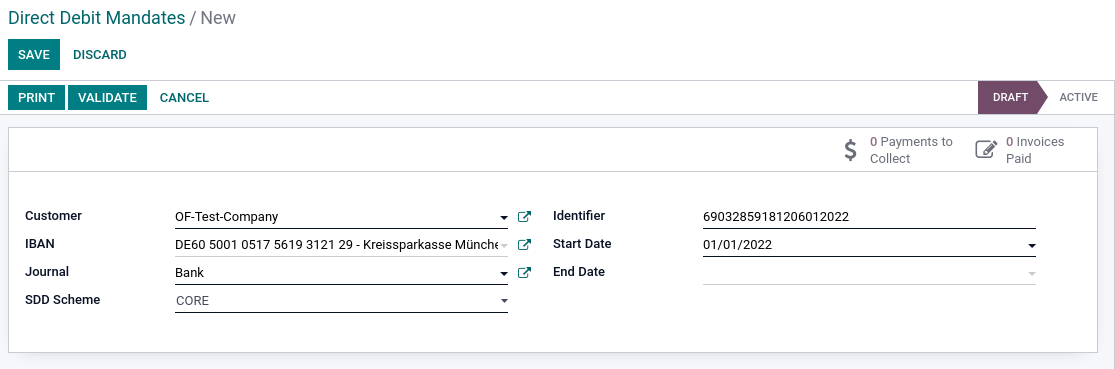
Customer is the link to the partner data set from the address book. Name, customer number (reference), database ID, or external ID may also be used here.
IBAN: the previously created account number. You can only use IBANs here. Of course, a database ID or an external ID can also be used with an account number, but even then, Odoo will check whether it is an IBAN account,
Journal: the name of the respective account’s journal where the collected direct debits are to be booked.
SDD Scheme: here, the default value is Core. If you want to read about the differences in handling and structure, see https://www.europeanpaymentscouncil.eu/what-we-do/sepa-payment-schemes/sepa-direct-debit/sepa-direct-debit-b2b-rulebook-and-implementation.
Identifier is the mandate ID. If such an ID exists from the previous system, you can, of course, import it; otherwise, Odoo will generate an ID from the current timestamps and a random number.
Start Date: the date of effect.
State: this value is mandatory but cannot be set from Import. For all newly created mandates, it is automatically set to Draft.
An
import template called SDD
Mandate (sdd.mandate).xlsx
is attached: 
After
Import, the mandates have to be confirmed.
Up to and including Odoo 13:
In previous versions, Odoo will check the existence of a document as a binary field that is importable via Excel. Since a confirmation in bulk is also not possible, the user has to open each imported mandate. The original written confirmation may be scanned and attached. Alternatively, a blank PDF file has to be uploaded as a placeholder.
Since Odoo 14:
As of version 14, this field is no longer available (because it was probably mostly filled with a placeholder anyway, which unnecessarily inflated the database as the file was not stored in the file store), and no further action to confirm is required.
Unfortunately,
there is no Odoo version where confirmation of several mandates at
the same time is possible. This means that each mandate has to be
opened and confirmed separately. A Python script programmed by a
developer that runs through each unconfirmed mandate and triggers the
action_validate_mandate
process may offer an alternative here.
Manual creation / maintenance
Obviously, it does not make sense to create or update data via Excel if individual customers are updated in the daily routine. I will, therefore, list some points of interest here on manual creation / use, as there are additional features that have not been addressed in the chapter on Import, as they are part of daily routine and processes.
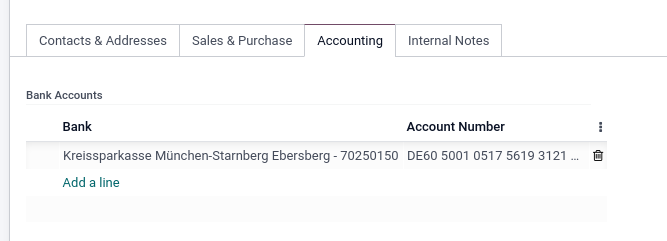
1) Partner
The starting point is clearly the Partner master record itself. Here, the bank account and the SEPA mandate may be managed centrally. However, you will need the authorization level for Accounting to do that. The Accounting tab is only visible for those with this authorization.
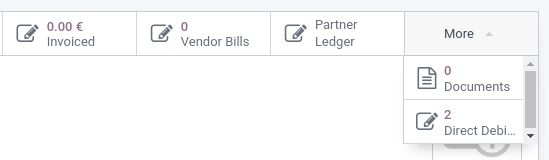
This
also applies to the SEPA Mandate. Here, the access is hidden behind a
smart
button:
For both cases, the fields have already been explained above in the chapter on Import.
2) SEPA Mandate
The SEPA Mandate may be accessed via a partner record or the Finance / Customer / Direct Debit Mandates menu item. In both cases, however, you need at least the authorization level Accounting.
For a Direct Debit Mandate, the process flow depending on the status Draft and Active is of interest.
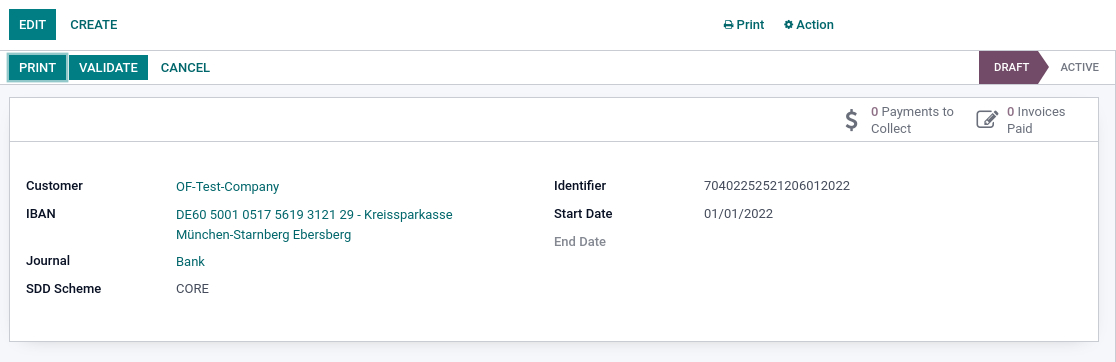
A
newly created mandate automatically gets the status Draft.
Via the PRINT
Button, a pre-filled PDF may be opened directly, which can either be
sent by e-mail or printed.
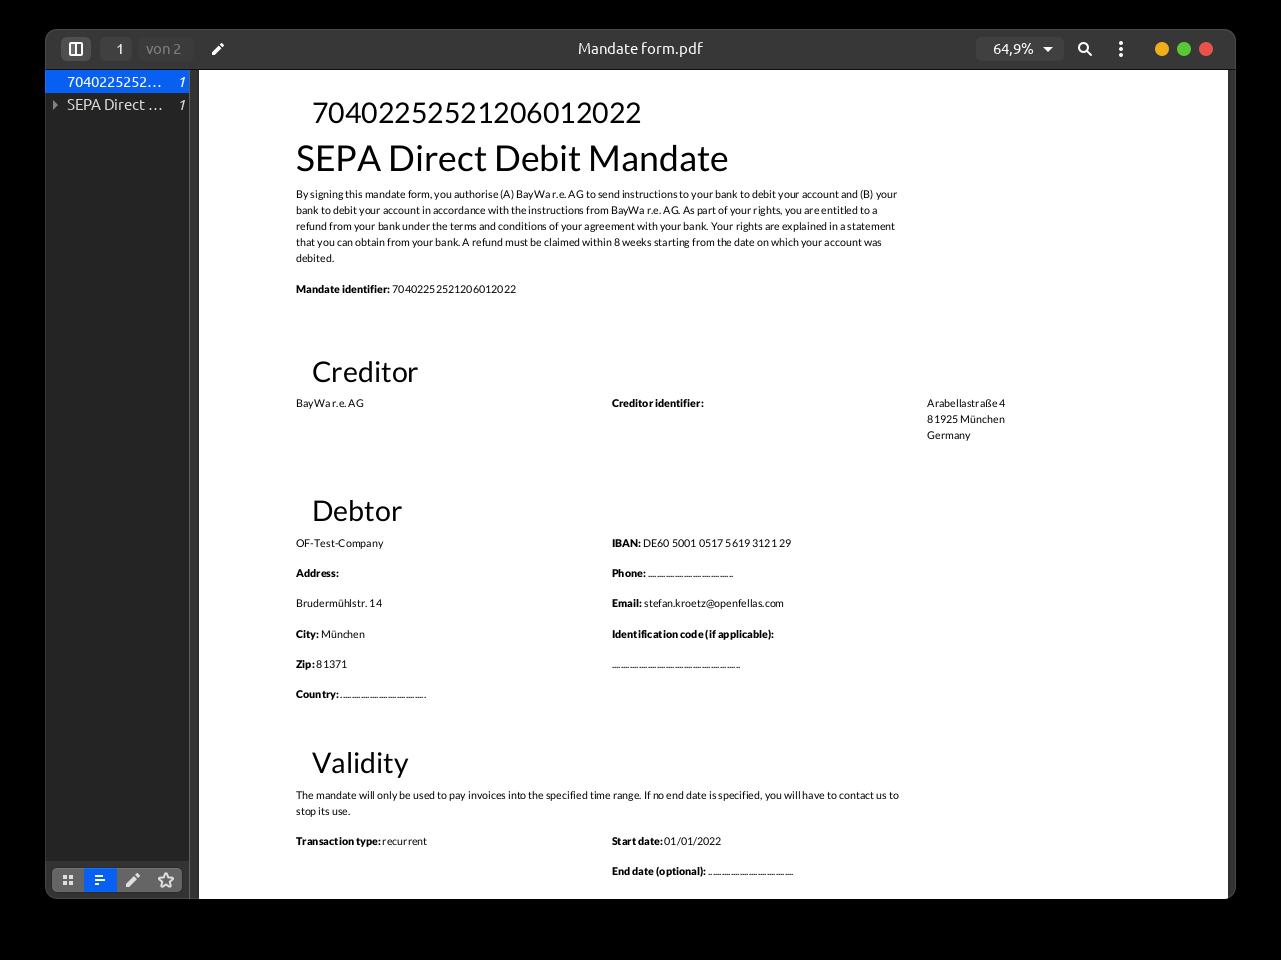
If
the mandate does not have to be printed but can be sent per e-mail,
it is advisable to send the printed PDF to the customer via
Chatterbox, making it quite easy for the signed version to be
returned to Odoo.
Once a mandate has been activated, two additional functions become available:
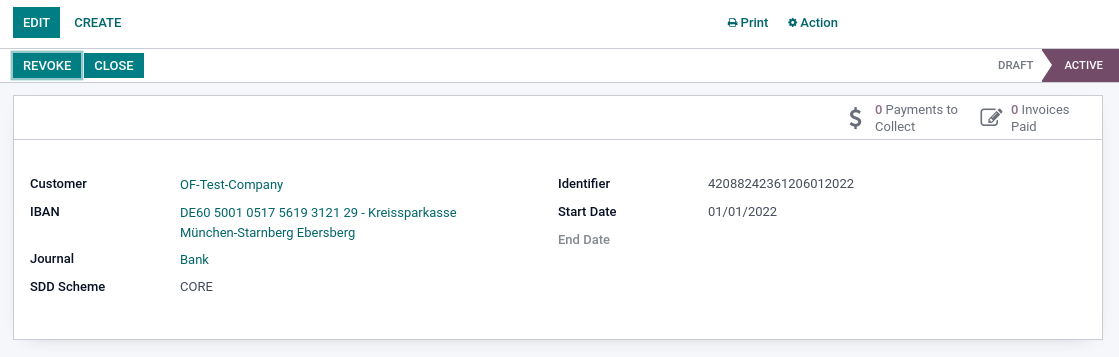
REVOKE
If a customer revokes a mandate, this revocation may be stored via the REVOKE button. The data record will be closed accordingly, and the mandate can no longer be used.
CLOSE
A data record may, of course, also be closed without a revocation via the CLOSE function. It also shuts down the mandate immediately, regardless of the end date, so it can no longer be used for further collection.
Suppose a mandate is closed accidentally, no matter whether by the REVOKE or CLOSE button, the mandate cannot be reactivated. In this case, the only way to create and activate a duplicate is to use the duplicate function. However, this will result in a new reference number.
3) Bank account
For users who do not have an Accounting license, the list of bank accounts known in the system is visible via the Contacts App. But even here, you require at least Sales Manager rights.
Via Contacts/Configuration/Bank Accounts, you can review the list of know accounts.
Since each IBAN contains a check digit, each value is checked when it is created or saved. Only valid entries can be saved.
Note:
If you want to create an account for testing purposes, you can easily generate IBANs via an online generator: http://randomiban.com/?country=Germany.
If
there is an error message when saving, the journal is misconfigured,
or the customer’s account number is incorrect.
Implementation
Now
we are ready to collect the direct debits. Again, there are
significant differences between Odoo versions up to and including
Odoo 12 and versions Odoo 13 and above. In Odoo 13, the accounting
has been completely revised. The most crucial aspect for us is that
from Odoo 13 upwards, there are “no invoices“ anymore. Since it
is clearly still possible to write invoices, what are we to make of
this sentence?
The difference between Odoo 12 and Odoo 13 and above
Anyone working in accounting before the age of IT will know the process. In the morning, mail was collected in a yellow plastic box, and all letters were opened, stamped with a receipt stamp, and categorized. Each invoice was checked and then assigned to accounts, usually by writing the G/L account numbers on the invoices by hand. Subsequently, they were sent to the accountant, who created a posting record in the system.
Until Odoo 12, this process was mapped similarly in the system. There was a technical object called account.invoice Whether created via a sales order, a purchase order, or manually, each record was created in account.invoice. Odoo also took care of the initial account assignment. In combination with the journal, the product of the invoice item, and the tax allocation, each newly created line was preassigned with a revenue or expense account. In addition, the customer or vendor account was added to the invoice header, and a posting record was generated as soon as the invoice was confirmed. Both data record structures were linked with each other.
Since Odoo 13, the information structure for an invoice has been disposed of, and everything has been merged into the posting record. The official (and correct) reason was that much of the information within both structures were identical, so combining them would make sense.
Since then, there have been only posting records. For some of them, documents are generated, and, in principle, attachments may be added to each accounting record.
Apart
from the fact that the system has become much more straightforward to
handle, the change has significantly impacted direct debit
collection. Where previously only invoices could be collected, any
type of debit-side entry may now be used for direct debit. And, of
course, the access is different. But since Odoo 12 is now already
among the versions no longer supported, we will skip the steps
involved.
Step 1: Creating a receivable
Of course, everything starts with a receivable. In our case, we create an outgoing invoice:
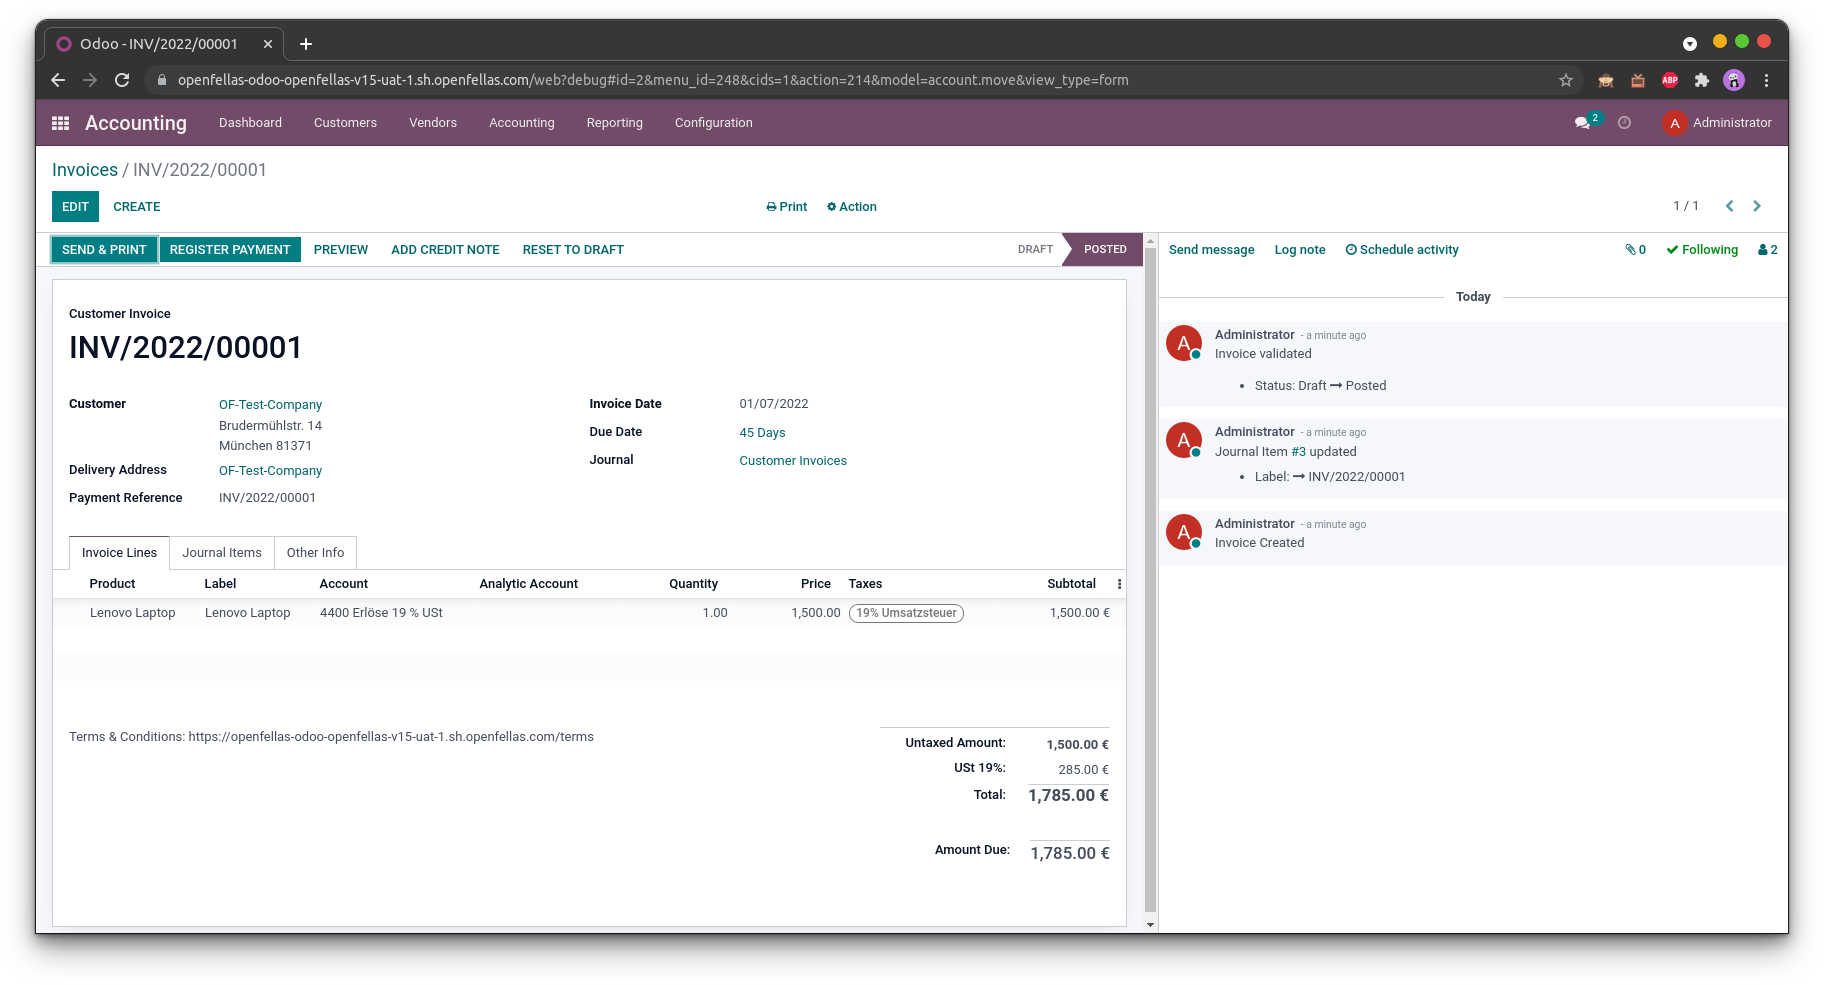
Basically,
it does not matter whether the customer wants to pay with direct
debit or not (at least it does not matter for the Odoo standard
process). This offers plenty of material for discussion. It must be
said, however, time also passes between opening and settling a
receivable, unless we talk about a check-out process within a store,
where recording the payment is part of the process, without which it
cannot be completed, And as you know, whenever time passes, things
change, and people tend to reconsider.
So,
if the determination of the payment method were relevant at the time
the receivable is created, there would have to be a process for
changing the payment method. If you don’t have to commit yourself,
you do not have to change anything.
Step 2: Selection of open receivables
The more crucial question is how to determine the documents collected via direct debit. Starting a few versions ago, Odoo has provided a filter for this – in the form of the SDD Mandate. With the help of the Unpaid and Posted options, you should not only get the required list but also be able to assume with a fair degree of certainty that you will only get the desired amount of receivables:
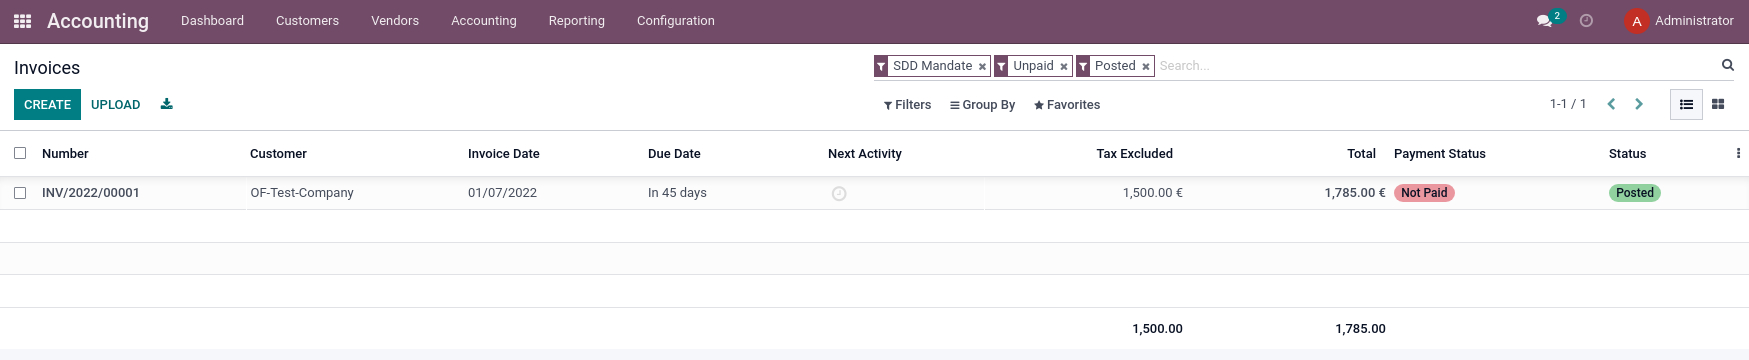
In
summary, the following filters have been set:
- SDD Mandate –> receivables where a customer has a current direct debit mandate.
- Unpaid –> only for open receivables, regardless of whether a partial payment has already been posted; in this case, Odoo would only include the balance in the payment proposal. 7
- Posted
–> this filter ensures that only posted receivables are included.
Step 3: Entering payments
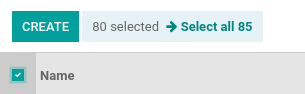
Now we select all invoices.
Caution: In Odoo 15 (and higher versions), setting the checkmark in the header is sufficient. The system then automatically assumes that the selection affects all filtered records, no matter how many records are displayed on the respective page.
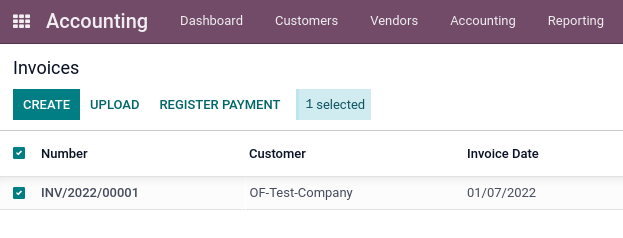
Odoo
14 displayed an additional option after Select
all that
could be used to extend the process to the complete list:
In
all previous versions, the list had to be extended to the total
records before the selection by clicking on the right arrow in the
display „1-80“ and changing to a number greater than the total
records:
1.
Click on 
2.
and extend 
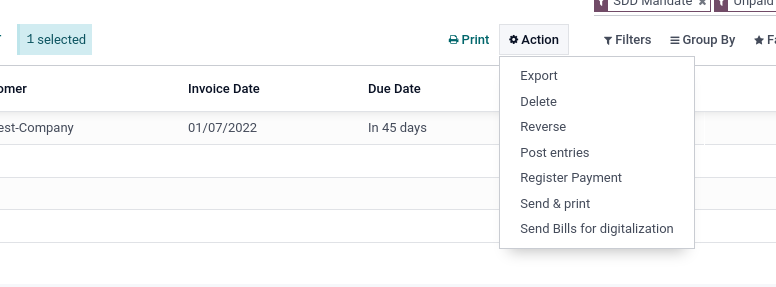
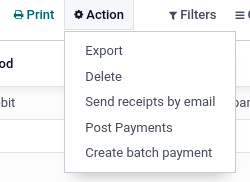
Step 4: Creating the payment
Now we click on the pull-down menu and select Register Payment:
In the new dialog screen, we select the desired journal and SEPA Direct Debit as the payment method:
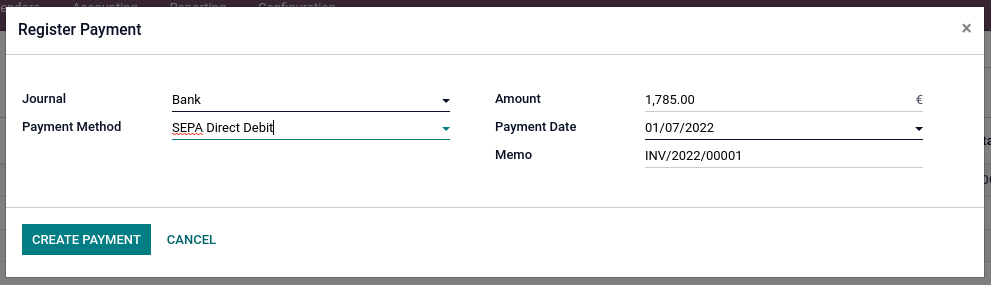
Explanation of the fields:
- Journal: All journals of the Bank or Cash type may be selected here. Select the journal where the direct debits will be collected.
- Payment Method: Select the preferred payment method here. Since our purpose is already clear, we select SEPA Direct Debit.
- Amount: Odoo automatically calculates the open balance of all marked invoices. If you grant cash discounts to customers, you should consider this when creating the payment terms, as it directly impacts the due date and the amount of the direct debits.
- Payment Date: The date of our payment proposal and, accordingly, the date of the corresponding entry.
- Memo:
The payment reference. In the journal, where the respective invoices
are posted, it is possible to configure the default text, such as
the invoice number or the customer number.
Step 5: Bundling for batch payments
In the last step, we create a batch payment for the individual payments that we can import into the respective account. You may remember that we activated this step already during the configuration.
To do this, we go to the menu Finance / Customer / Batch Payments and select as follows:
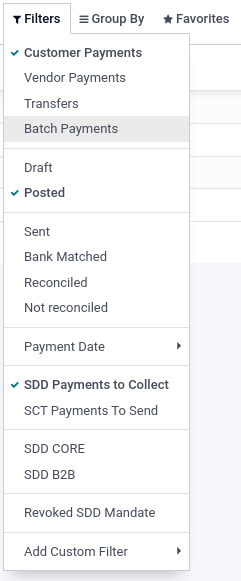
Explanation of the filters:
- Customer Payments: The list is restricted to recorded customer payments only.
- Posted: This will filter only confirmed and posted payments
- SDD Payments to Collect: Again, we only focus on payments with a running direct debit mandate.
If you work with different SEPA structures, you need to consider this during this process and optionally add either SDD Core or SDD B2B.
As before (see Step 4: Creating the payment), all records should be marked for the next step via the Select all option on the top left of the column header:

Now
you click again on the pull-down menu and select Create
batch payment:
Step 6: Validation and Export
This step immediately generates and directly opens the batch payment.

In this menu, you can check the bundled payments again. The final step in Odoo would be to validate them.
In doing so, you automatically generate a SEPA file that may be downloaded from Odoo and uploaded to the bank program for execution.

The
proper way to post it is a use case for bank postings.
General notes
Here
are some general notes regarding the configuration and the steps
described above.
1) Payment status of the invoice
Up to Odoo 13, you can configure a setting in the respective bank journal to see whether an invoice is already considered to be paid or not.
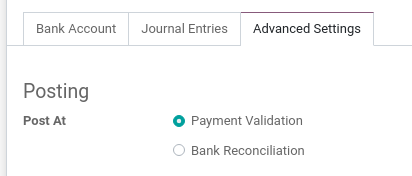
The default setting was Payment Validation. This means that an invoice is already considered to be paid when the payment is posted, which may be the case for a credit card or other online payments; in the case of direct debits, it may also be true for most of these, but it should not be taken for granted.
If
you switch to bank reconciliation, the receivable is not considered
paid until the payment has been posted to the bank account. Until
then, the corresponding document is displayed with the status In
Payment.
2) System job SSD Mandates
Odoo triggers a daily system job that automatically checks all SDD mandates. This entails two activities:
- If the End date is the current date, the mandate is automatically set to CLOSE.
- If the client has not been in use for 36 months, Odoo will deactivate it, following an EU legal requirement.
Was this article helpfull information to you?
Would you mind to leave us a review of your experiences with openfellas?
Talk to our experts.
We will find the solution best suited to you and your products!